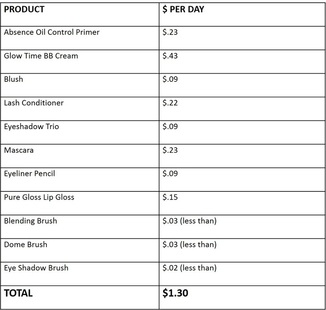
Per Day Break Down of Makeup Prices 01/12/16
Go down this road with me…You are in a cosmetic store and you pick up a tube of the “top of the line” BB cream that you have REALLY wanted to try out. You look on the back of the bottle and your heart stops when you see how much that little tube is going to cost. You start thinking of all the other things you could be spending that money on. You could at the very least buy a pretty decent pair of jeans, or start a small savings account for your child’s college fund. You are contemplating on how you are going to justify spending that amount to your significant other, because you know how he reacts when you get your hair done. Maybe you feel guilty spending money on yourself ….Let’s pause there for a moment.
There is a better way to start thinking about those price points. I promise!
Your skin, is one of the most important aspects that make up YOU. It is your first impression, the one thing that can show all your flaws and perfection in a single glance. You only get your skin once. You have to take care of it and you have to be comfortable in it. When you choose makeup such as your foundation, it is important that you are choosing the best products possible because it is closest to your skin. You want something CLEAN, and usually those products come with a larger price tag. But those products also typically last longer.
Think about how many $8 bottles of drugstore brands you have bought over the years. Probably about one per month and I am guessing it took you about 3-4 bottles just to find the right color for your skin (If you even found it at all). Not only do you typically get to have a professional color match you with those higher priced bottles of foundation, but they can last up to 6 times longer than a drugstore brand because they are more pure. I want to show you how much PER DAY my makeup routine costs me.
|
My favorite line is Jane Iredale. There are many, many things I love about this line, which is an entirely different article within itself. But, My daily makeup routine consists of the products listed in this chart, out of that line. These products each last me anywhere from 3 months to a year, and the brushes I estimated 5 years for the sake of needing a number, but they can last a lifetime if you take care of them. Take a look at this table......... |
|
Seriously!!?? YES…. For about $1.30 a day you could have a clean, flawless face! That is less than a large bottle of water at a gas station! So the next time you look at the price of your makeup tubes, think about how long those dollars stretch out. Go meet with a makeup artist for a consultation of their favorite lines, (I would be happy to meet with you J) splurge on what you love and don’t feel guilty about it, because every woman deserves to feel beautiful inside and out! Make your face a priority, and invest in makeup that works with your skin instead of against it.
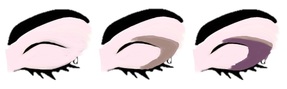
HOW TO Plum Eyeshadow 11/16/15
|
What you need:
|
|
GET THE LOOK:
Begin by using your Eye Primer in Petal and apply all over your lid up to your brow bone. You can use a small Shadow brush for this step or your ring finger.
Take your pressed eye shadow in Taupe, and with a fluffy shadow brush apply it to your crease as a transition color. Make a backwards ‘C’ motion - starting in the center of your crease, moving outward towards your corner, and back in to the middle of your lash line.
With your pressed eye shadow in Merlot, apply using a crease brush or a smaller shadow brush, and continuing that same Backwards ‘C’ motion. You can make this color more dramatic by going back over this motion until you have reached your desired color.
Using an angled or eyeliner brush, dip it into your Jelly jar Eyeliner in Black. Apply a thin line just across your lash line. For a more dramatic look, you may wing it out or make a thicker line. To get a smooth look on your eyeliner, make small short strokes instead of swiping all the way across. If you get a disconnected line, take a clean angled brush and brush over the lines you created. This will blend it together for a cleaner look.
Apply a GOOD coat of mascara on top and bottom lashes!
